Azure AD workload identity federation with Kubernetes
Enterprises are increasingly using cloud-native technologies to build software workloads. Modern development practices are embracing concepts such as microservices and containers. Kubernetes is emerging as a popular platform for deploying software workloads. An earlier blog post discussed how Azure AD workload identity federation avoids the need for secrets when accessing Azure resources from Google cloud. This blog post explores how services running in a Kubernetes cluster can also use this capability to access Azure resources. No secrets are necessary.
Using Azure AD workload identity federation with Kubernetes
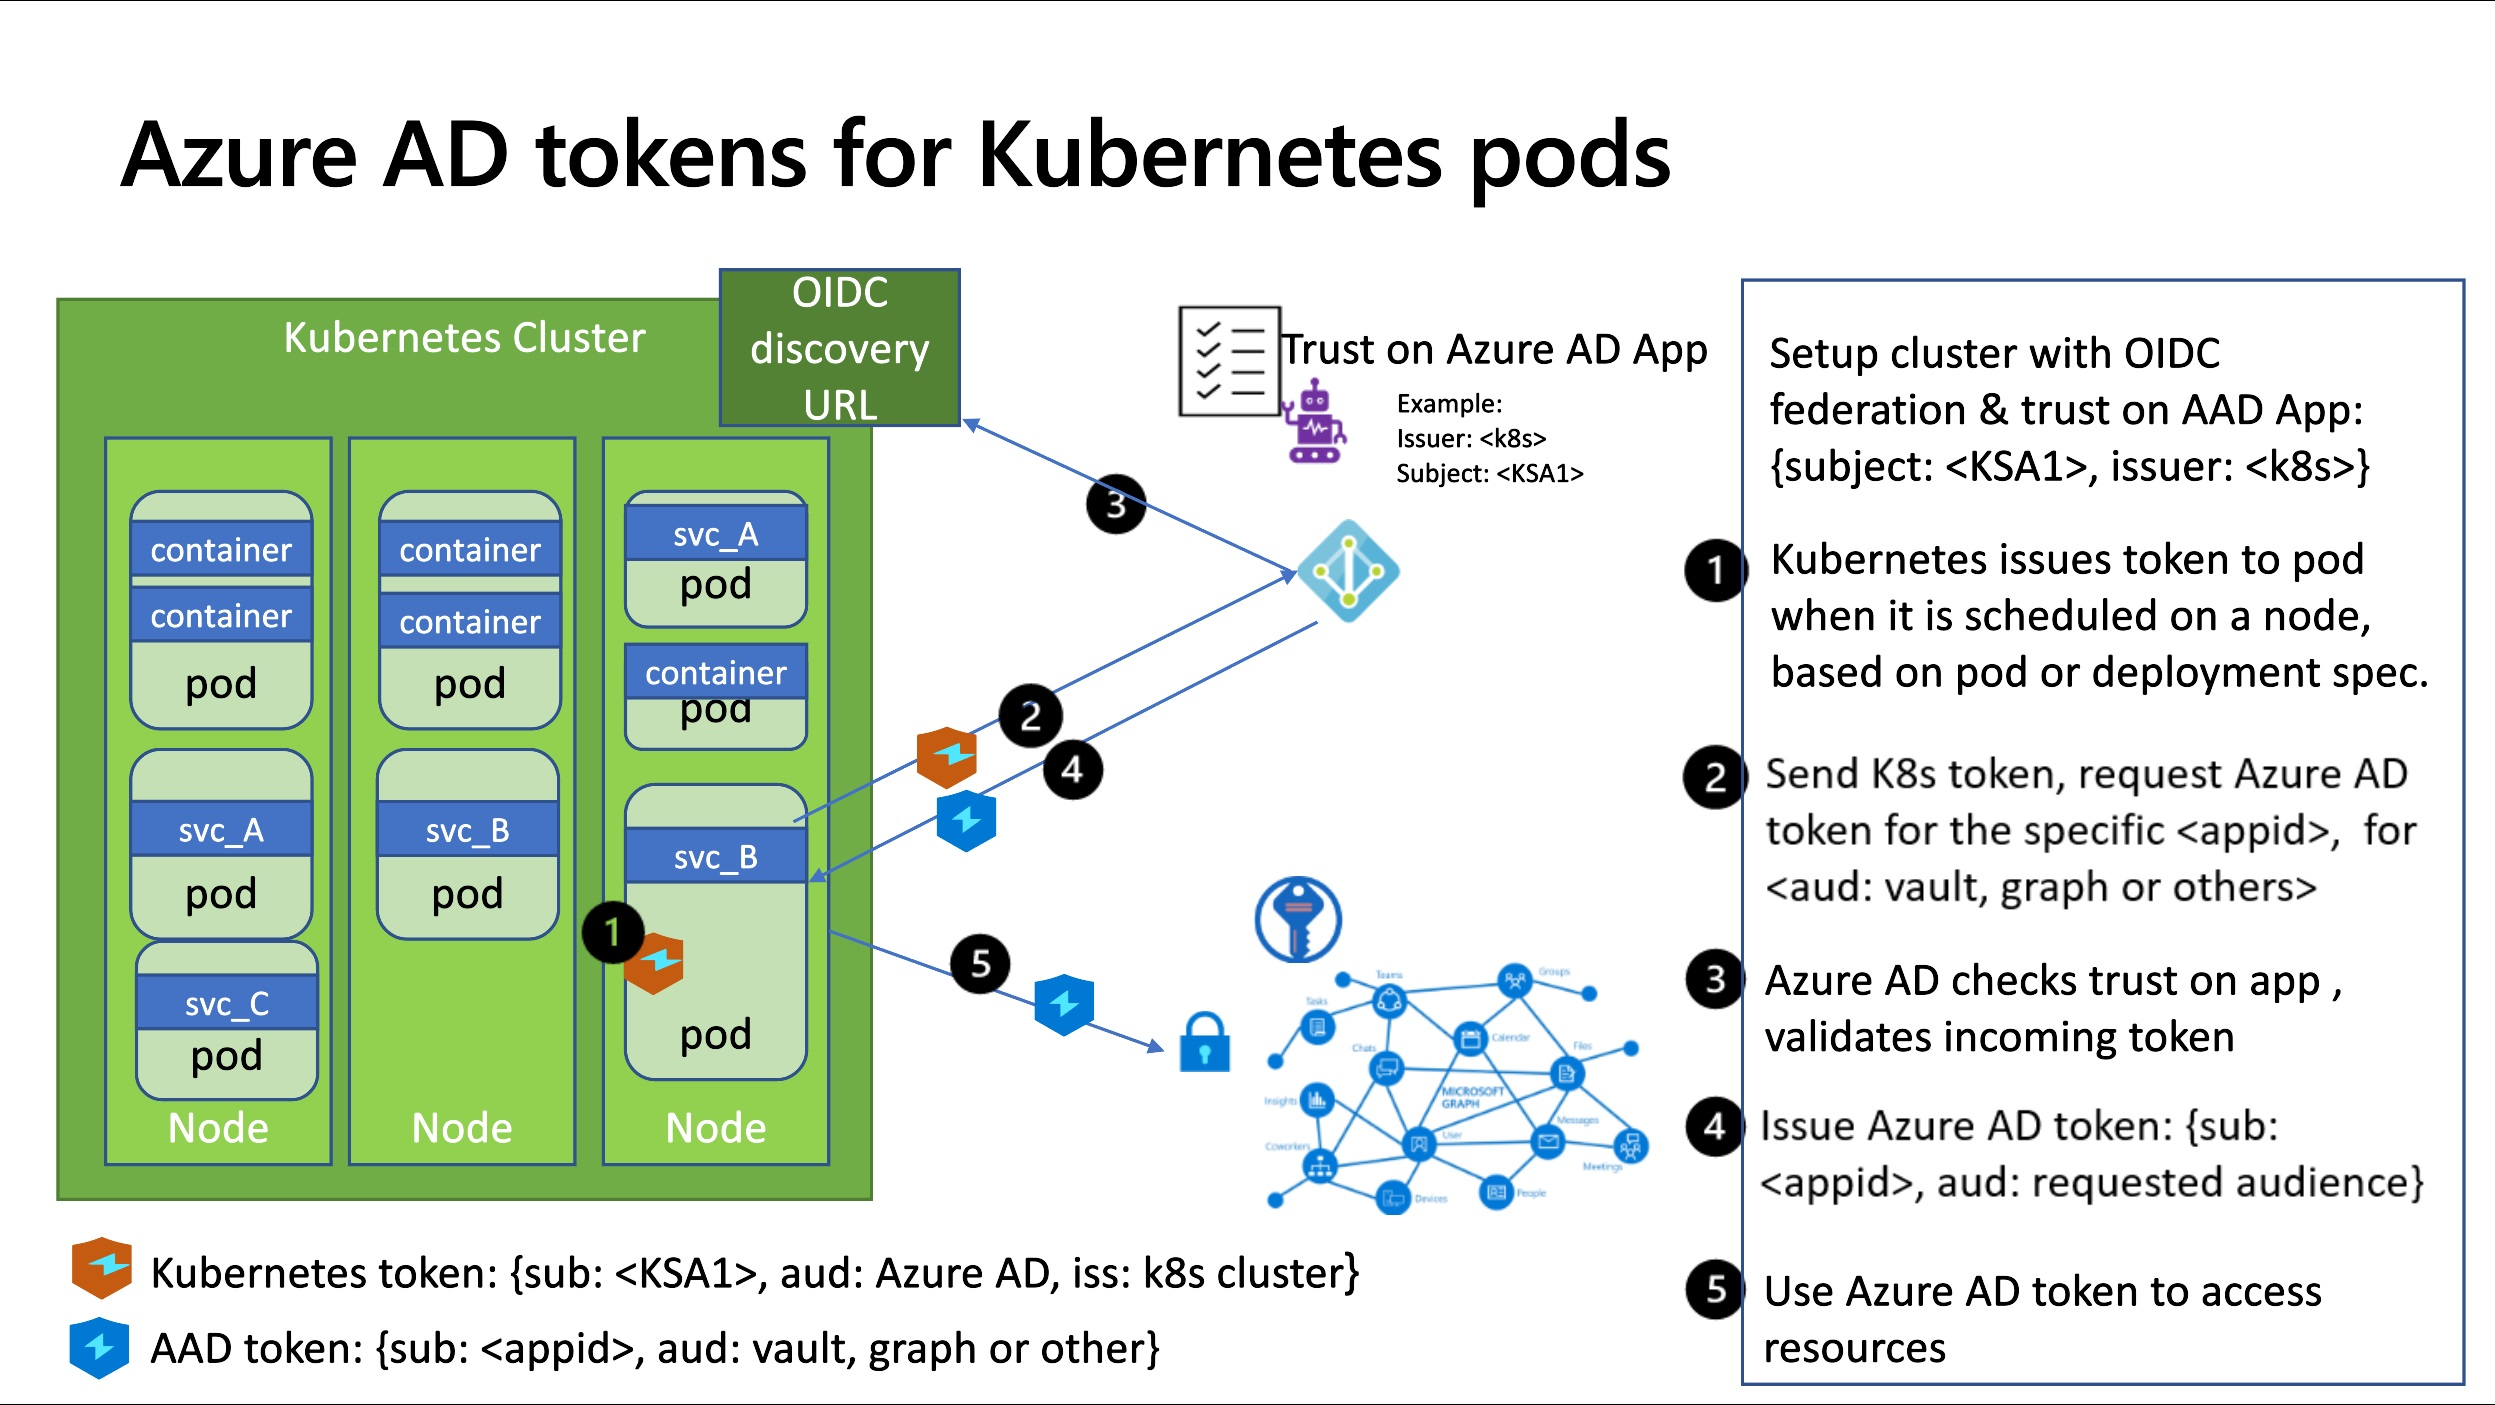
The basic pattern is similar to what we saw in the earlier blog posts for GitHub and Google Cloud. Tokens issued by providers such as GitHub or Google are exchanged for Azure AD access tokens.
There are four parts to get this working end-to-end in a Kubernetes cluster:
- Cluster administrators configure their cluster to issue tokens. An OIDC discovery document is published to allow validation of these tokens.
- Developers configure their deployments to use Kubernetes service accounts and get Kubernetes tokens.
- Azure AD applications are configured to trust the Kubernetes tokens
- The Kubernetes tokens are exchanged for Azure AD tokens, and used to access Azure AD protected resources such as Azure and Microsoft Graph.
Since this pattern uses constructs native to Kubernetes, it works where ever you deploy your cluster. It could be a cluster managed by a cloud provider such Azure or AWS or GCP. Or it could be a cluster you are self-managing in a cloud or on-premises.
Microsoft announced a new open-source project called Azure AD workload identity for Kubernetes to make it easy to deploy this in any cluster, whether it is running in Azure or elsewhere.
Let’s walk through this flow end-to-end using a managed cluster in Azure. Later in the blog, we will look at more details such as things to consider for your self-managed cluster.
End-to-end walk-through to demonstrate this
Part 1: Publish an OIDC discovery endpoint for your Azure Kubernetes Service (AKS) cluster
Since this is a new preview capability in AKS, there are several steps involved here:
- Explicitly opt-in by turning on the EnableOIDCIssuer feature flag on your Azure subscription
- Install an update to the aks extension in Azure CLI
- create a new cluster or update an existing one with the OIDC feature
See the AKS documentation for enabling OIDC issuer. Let’s use these steps from that documentation.
# Install an update to the aks extension in Azure CLI
az extension [add|update] --name aks-preview

# Explicitly opt-in by turning on the EnableOIDCIssuer feature flag on your Azure subscription
# az feature register --name EnableOIDCIssuerPreview \
                      --namespace Microsoft.ContainerService \
                      --subscription "${SUBSCRIPTION_ID}"

# Keep checking the status of the feature till it changes the state from "Registering" to "Registered".

az feature list -o table --query "[?contains(name, 'Microsoft.ContainerService/EnableOIDCIssuerPreview')].{Name:name,State:properties.state}"

# Now refresh the registration for Microsft.ContainerService
az provider register --namespace Microsoft.ContainerService

# create a new cluster or update an existing one with the OIDC feature
az aks [create|update] -g "${RESOURCE_GROUP}" --location "${LOCATION}" \
                       --enable-oidc-issuer --name "${CLUSTER_NAME}"
You will notice this section showing where AKS has published the OIDC discovery document.
"oidcIssuerProfile": {
    "enabled": true,
    "issuerUrl": "https://oidc.prod-aks.azure.com/700765c7-88f3-4d93-b606-24947451ea53/"
  }
Enable the mutating admission webhook to simplify config for your deployments
The second part of preparing the cluster is to install a mutating admission webhook. The webhook simplifies the configuration for your developers.
helm repo add azure-workload-identity https://azure.github.io/azure-workload-identity/charts
helm repo update
helm install workload-identity-webhook azure-workload-identity/workload-identity-webhook \
   --namespace azure-workload-identity-system \
   --create-namespace \
   --set azureTenantID="${AZURE_TENANT_ID}"
This adds a namespace to your cluster and deploy the mutating webhook:
kubectl get pods -n azure-workload-identity-system
NAME                                                   READY   STATUS    RESTARTS   AGE
azure-wi-webhook-controller-manager-76c47c487d-4dhs8   1/1     Running   0          10d
azure-wi-webhook-controller-manager-76c47c487d-qzxwc   1/1     Running   0          10d

kubectl get service -n azure-workload-identity-system
NAME                               TYPE        CLUSTER-IP    EXTERNAL-IP   PORT(S)   AGE
azure-wi-webhook-webhook-service   ClusterIP   10.0.42.255   <none>        443/TCP   10d
Part 2: Developers setup their deployment with a Kubernetes service account
Use a service account in your Kubernetes deployment. Annotate the service account with the identity of the Azure AD application you want to use. This mutating webhook will use the annotation to automate several configurations in your deployment.
apiVersion: v1
kind: ServiceAccount
metadata:
  name: demo-sa
  namespace: demok8s
  #
  # Annotate the service account with the Azure AD application which
  # has access to our Blob store.
  #
  annotations:
    azure.workload.identity/client-id: aead113c-24c6-47e3-93ce-3a7dafc5fdaa
    azure.workload.identity/tenant-id: 72f988bf-86f1-41af-91ab-2d7cd011db55
  labels:
    azure.workload.identity/use: "true"
Part 3: Configure an Azure AD application to trust tokens issued to that service account.
For this step, you need a couple of things.
- The issuer URL for your Kubernetes cluster.
az aks show --subscription $SUBSCRIPTION \ -g $RESOURCE_GROUP --name "${CLUSTER_NAME}" \ --query 'oidcIssuerProfile.issuerUrl' -otsv - The subject name in the tokens issued to this service account. Kubernetes uses the following format for subject names:
system:serviceaccount:<namespace>:<service account name>So for the sample service account above, the subject name will be system:serviceaccount:demok8s:demo-sa
There are several ways to configure the Azure AD application with a “Federated Identity Credential” using this information:
Using the Azure AD portal
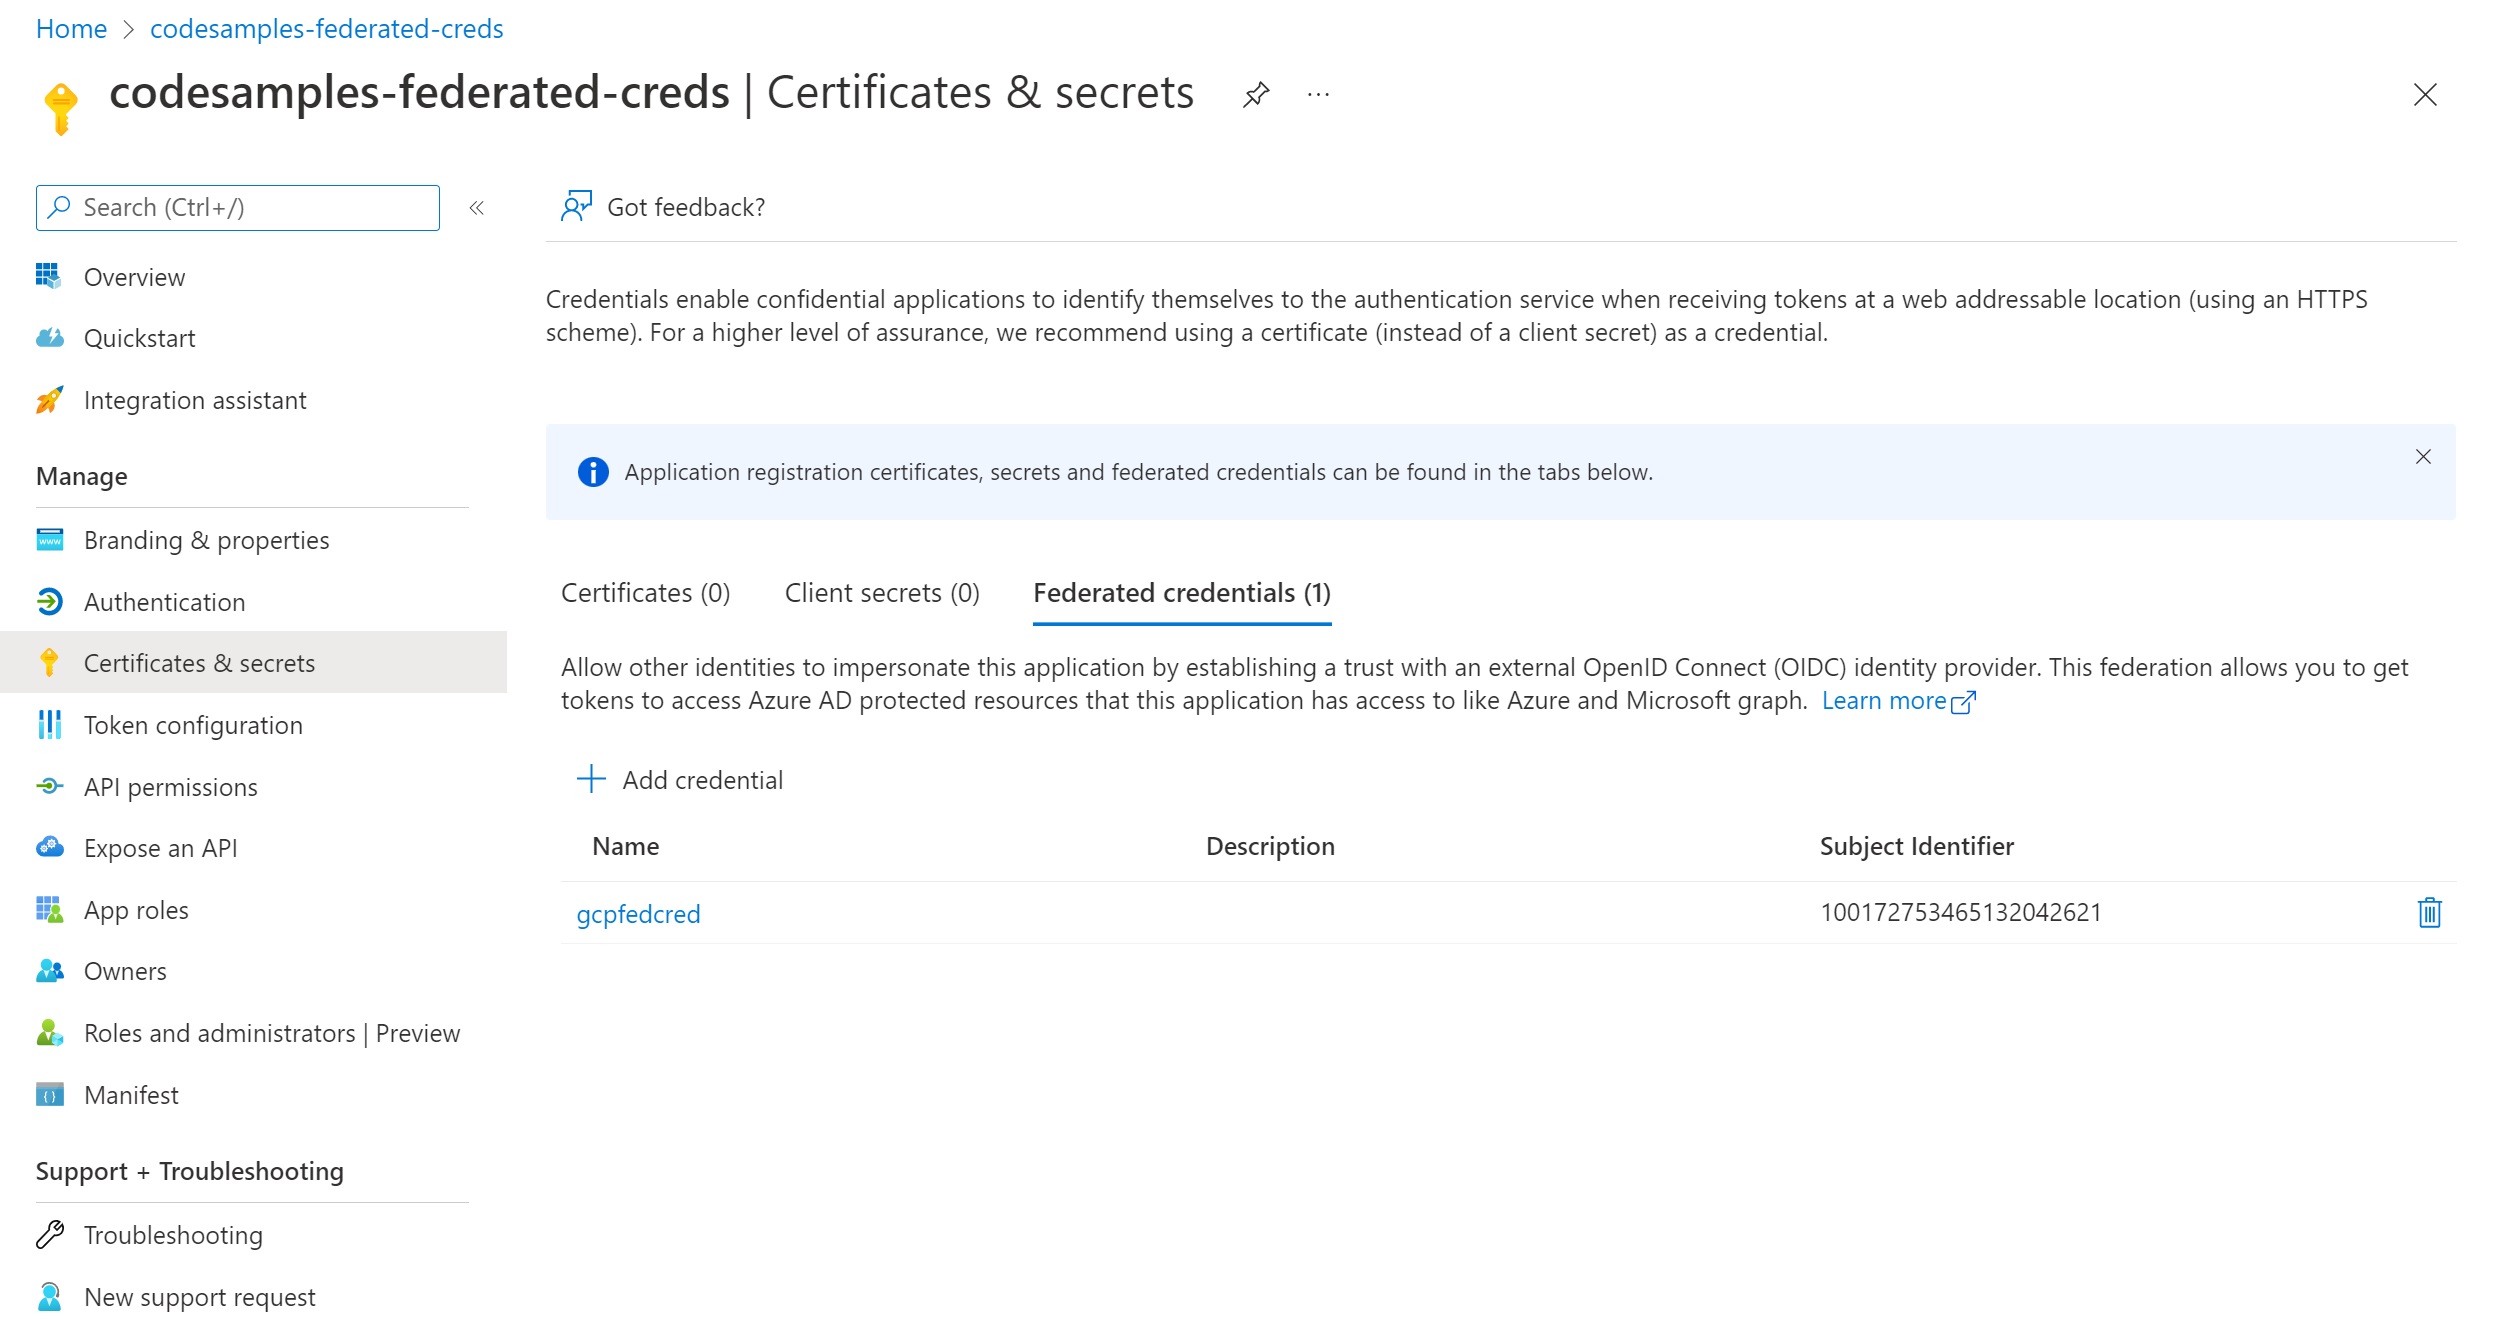
The Azure AD portal has added preview features to simplify this configuration. Visit the Azure AD portal, and pick your application under “App registrations”. Go to “Certificated & secrets” and pick “Federated Credentials”. Select “Add credential”.
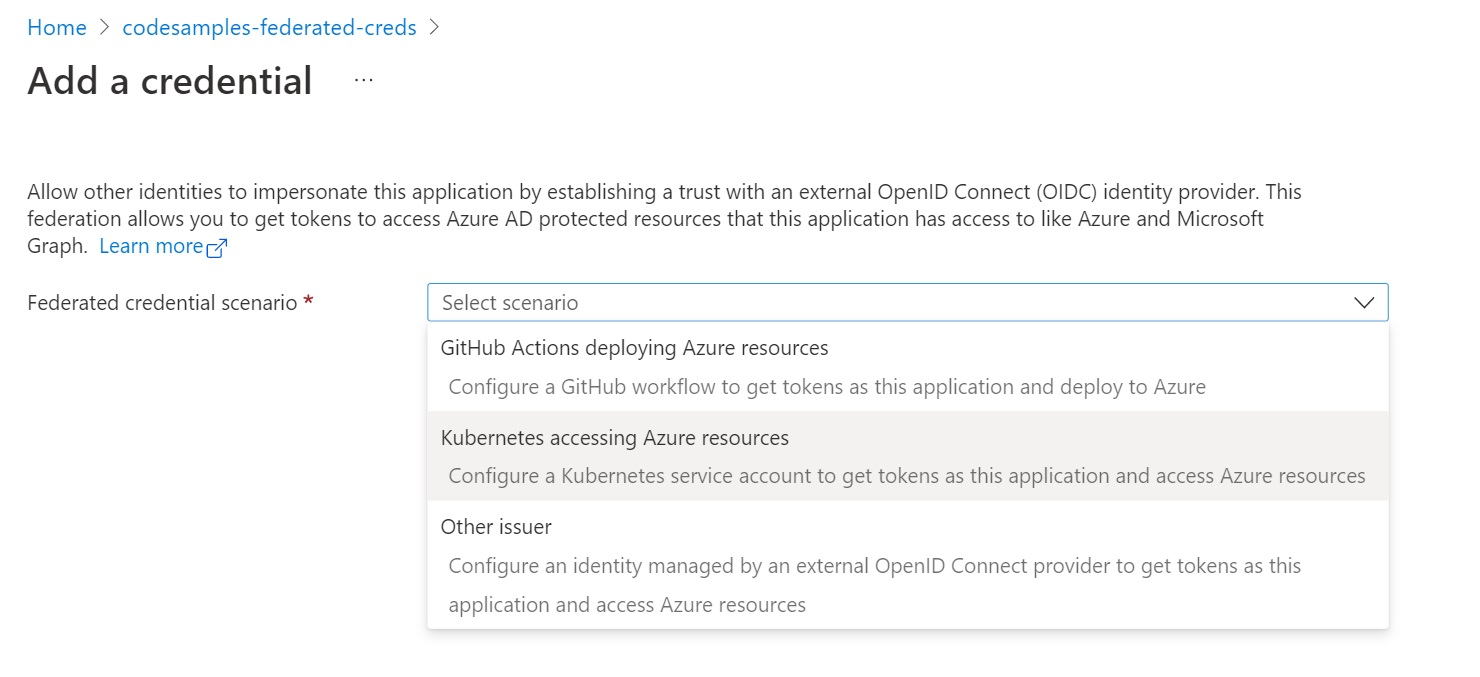
In the “Federated credential scenario”, pick “Kubernetes accessing Azure resources”
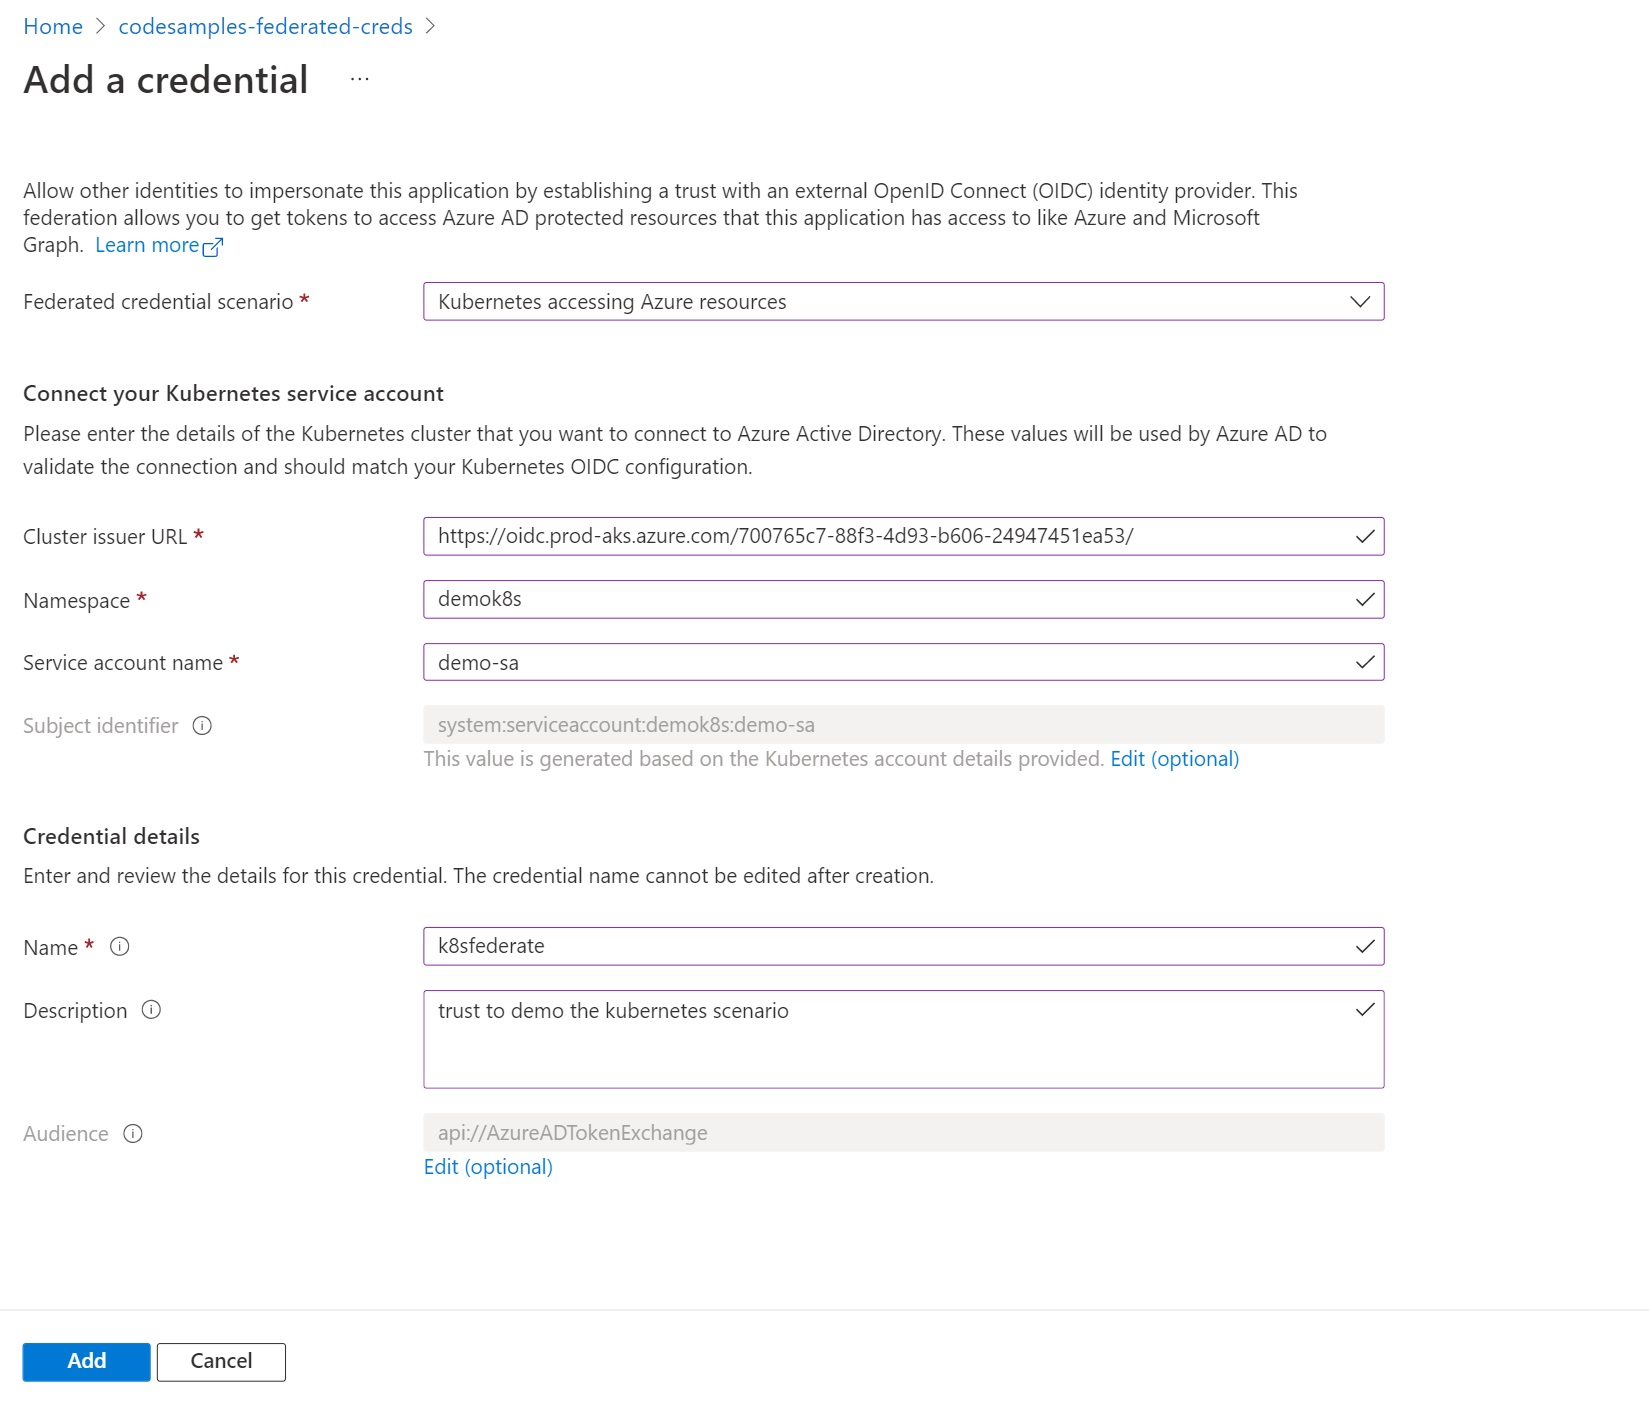
 Populate the cluster issuer URL, the namespace and service account for your deployment. Azure AD will populate the subject name with the format used by Kubernetes.
other ways to achieve this
You can also use the Azure CLI or do this programmatically. See this blog post for details.
Part 4: Access Azure resources using the Kubernetes token
Kubernetes issues a token for the service account at a file location specified by the mutating webhook. This token can be exchanged for an Azure AD access token. My github repo provides a simple example to demonstrate this exchange. It shows this for both Azure Identity SDK and Microsoft Authentication Library.
Updates to the Azure Identity SDK use the configuration setup by the mutating admission webhook. This allows us to use existing and familiar code patterns. Here’s an example snippet for accessing Azure blob storage:
import { BlobServiceClient } from "@azure/storage-blob";
import { DefaultAzureCredential } from "@azure/identity";

const credential = new DefaultAzureCredential();

const blobClient = new BlobServiceClient(`https://${account}.blob.core.windows.net`,
                                          credential );
Using Microsoft Authentication Library (MSAL)
Alternately, you can use MSAL and write code similar to what we saw in the blog for Google Cloud. In the case of Kubernetes, the token is available at a file location configured by the mutating admission webhook. The value of this file location is available in the AZURE_FEDERATED_TOKEN_FILE environment variable.
async function k8sToken() {
  return new Promise(function (resolve, reject) {
    fs.readFile(process.env.AZURE_FEDERATED_TOKEN_FILE, "utf8", function (err, data) {
      if (err) {
        logger.error("k8s token error %o", err);
        reject(err);
      }
      else {
        logger.debug("k8s token is %o", data);
        resolve(data);
      }
    });
  });
}
We can exchange this token for an Azure AD access token. This is identical to what was described in the Google Cloud blog post and repeated here for completeness.
Now that you have a Kubernetes token, we can exchange this for an Azure AD access token. The Microsoft Authentication Library (MSAL) is updated to allow you to pass the Kubernetes token as a “clientAssertion”. The following MSAL versions have support for client assertions:
Here’s a sample code snippet to demonstrate this, extracted from my repo:
const msal = require("@azure/msal-node");
import {TokenCredential, GetTokenOptions, AccessToken} from "@azure/core-auth"

class ClientAssertionCredential implements TokenCredential {


    constructor(...) {
        //constructor stuff. Store clientID, aadAuthority, tenantID for later use
        // Note that the mutating webhook publishes these environment variables from the // service account annotations
        // process.env.AZURE_CLIENT_ID;
        //process.env.AZURE_TENANT_ID;
    }

    async getToken(scope: string | string[], _options?: GetTokenOptions):Promise<AccessToken> {

        var scopes:string[] = [];
        // write code here to update the scopes array, based on scope paramenter


        return k8sToken() // calling this directly just for clarity,
                          // this should be a callback
        .then((clientAssertion:any)=> {
            let msalApp = new msal.ConfidentialClientApplication({
                auth: {
                    clientId: this.clientID,
                    authority: this.aadAuthority + this.tenantID,
                    clientAssertion: clientAssertion,
                }
            });
            return msalApp.acquireTokenByClientCredential({ scopes })
        })
        .then(function(aadToken) {
            // return  in form expected by TokenCredential.getToken
            return({
                token: aadToken.accessToken,
                expiresOnTimestamp: aadToken.expiresOn.getTime()
            });
        })
        .catch(function(error) {
            // error stuff
        });
    }
}
Here’s an example of how you can use this in an Azure SDK such as storage-blob
const { BlobServiceClient } = require("@azure/storage-blob");

const tokenCredential =  new ClientAssertionCredential(...);

const blobClient = new BlobServiceClient(blobUrl, tokenCredential);
When you make requests to the blobClient to access storage, the blobClient calls the getToken method on the ClientAssertionCredential. This results in reading the Kubernetes token from the file location and exchanging it for an Azure AD access token.
Digging into the details.
Let’s take a closer look at a few things:
Setting up the cluster with an OIDC discovery URL
When you run “aks –enable-oidc-issuer”, it does the following:
- Configure the cluster with signing keys for the Kubernetes Service Account Token Volume Projection feature. This feature is stable in v1.20.
- For key hygiene, AKS rotates these keys every 90 days.
- Publish the OIDC discovery document at an endpoint, so the Kubernetes tokens can be validated by other identity providers such as Azure AD.
If you are using a managed cluster other than AKS, follow instructions from your providers such as EKS or GKE to enable this on your cluster.
For self-managed clusters, use the guidance provided here.
The utmost care needs to be exercised in guarding the signing keys provided to your cluster. Getting rid of secrets for your developers is made possible by making the cluster a token issuer. When using the token volume projection feature, you are providing the keys the cluster uses to sign these tokens. Attackers can access all the resources available to any pods in the cluster if these keys are compromised! Your planning considerations must include a disciplined schedule for rotating these keys. See this guidance for details on implementing the rotation of these keys.
For publishing the OIDC discovery document for your self-managed cluster, you have a couple of options. The guidance provided here contains two parts:
Note that the JWKS has to be refreshed each time you rotate the keys. The instructions for how to do this are part of the guidance for service account key rotation.
Alternatively, you can also investigate a Kubernetes feature called Service Account Issuer Discovery.
The mutating admission webhook
The mutating webhook, an optional component, simplifies the configuration for your developers.
Kubernetes supports admission webhooks which provide an opportunity to change the configuration of your deployment on the fly. The mutating webhook uses this support to simplify the configuration for developers. Developers can simply annotate their service accounts. The mutating webhook uses that information to populate the rest of the necessary config.
Here’s a sample configuration that’s automatically generated by the mutating webhook, based on the annotation on the service account.
        env:
        - name: AZURE_CLIENT_ID
          value: aead113c-24c6-47e3-93ce-3a7dafc5fdaa
        - name: AZURE_TENANT_ID
          value: 72f988bf-86f1-41af-91ab-2d7cd011db55
        - name: AZURE_FEDERATED_TOKEN_FILE
          value: /var/run/secrets/tokens/azure-identity-token
        volumeMounts:
        - mountPath: /var/run/secrets/tokens
            name: azure-identity-token
            readonly: true
      volumes:
      - name: azure-identity-token
        projected:
          defaultMode: 420
          sources:
          - serviceAccountToken:
              audience: api://AzureADTokenExchange
              expirationSeconds: 3600
              path: azure-identity-token
Kubernetes behavior for projecting tokens
Once the Service Account Token Volume Projection feature is turned on, Kubernetes will issue tokens at the location configured by the mutating webhook. It keeps this token refreshed so that it is always available when a pod needs to use it. As per the K8s documentation for this feature, the token is refreshed when it is older than 80% of its TTL or older than 24 hours. If your application caches the token, make sure this cache is refreshed regularly. The Kubernetes guidance suggests “Periodic reloading (e.g. once every 5 minutes) is sufficient for most use cases.”
The best practice for these tokens is to have a unique audience value for each provider you intend to use the token. The webhook uses the Microsoft recommended value for tokens meant for Azure AD (api://AzureADTokenExchange). This value needs to match the value you configured the Federated Identity Credential on your Azure AD application.
Security boundaries provided by Kubernetes namespaces
The norm for many companies is to have a single Kubernetes cluster shared by numerous development teams. Resources available to one team mustn’t be accessible by another team sharing the same cluster. Kubernetes namespaces ensure this boundary between different teams. Kubernetes adds the namespace in the subject identifier of the token it issues. A service in one namespace cannot get a token to access resources available to a service in another namespace. Here’s an example: Let’s take a service account called “BlobService” in namespace “Team-A”. The subject identifier in the Kubernetes token will be “system:serviceaccount:Team-A:BlobService”. Let’s configure this subject identifier in the federated identity credential on Azure AD application “AppA”. Team-B can not get a token with this same subject identifier. Let’s assume Team-B created a service account called “BlobService” in their namespace. Kubernetes tokens for that service account will have a subject claim of “system:serviceaccount:Team-B:BlobService”. Those tokens can’t be used to get Azure AD tokens for AppA. Azure AD will not find a matching subject identifier for AppA.
Microsoft Identity SDK support for exchanging tokens
The Microsoft Authentication Library (MSAL) supports using the Kubernetes token as a clientAssertion in the Confidential Client flows. The code snippet earlier in this blog demonstrated this.
The Azure Identity SDK has updated the DefaultAzureCredential to support this pattern. Under the covers, DefaultAzureCredential will look for the bread crumbs left behind by the mutating webhook. If it finds the AZURE_FEDERATED_TOKEN_FILE, AZURE_CLIENT_ID, and AZURE_TENANT_ID environment set, it uses those values to get an Azure AD token.
In conclusion
Azure AD workload identity federation is a new capability that allows you to get rid of secrets in several scenarios such as Kubernetes, services running in Google Cloud, and GitHub Actions workflow. Stay tuned for many more scenarios where you can use this capability to get rid of secrets.
If you have any comments, feedback, or suggestions on this topic, I would love to hear from you. DM me on Twitter